A Green Project Challenge

The intent of this project is to see if being more green is viable given the cost of materials vs. the Return On Investment (ROI) for operating my own greenhouse aquaponics/aeroponics system in our backyard. The challenge is whether I can design, build and operate an aquaponics/aeroponics based greenhouse system in a sustainable manner with a small carbon footprint while providing food for the table at a reasonable cost over conventional methods such as purchasing fish/vegetables at the local grocery. Join me on this journey of discovery while I forge a new chapter in my quest for a better tomorrow.
Showing posts with label Tank. Show all posts

Saturday, March 31, 2012

Adding Mozambique Tilapia to the Fish Tanks

I finally have some Mozambique Tilapia in the fish tanks. I made the journey to Overton Fisheries south of Corsicana, a three hour drive one way to pick up about 50 fish. Overton's has a pretty nice operation with quick friendly service. They had me in and out in about 30 minutes.Overton's was out of fingerlings so I had to go with the normal stocking mixed sex/ mixed size offering at $10 per LB....it was a much better choice than fingerlings, and for about the same price, I received much larger fish.


The fish were packed in a large bag/box with some fishy valium and oxygen to keep the Tilapia calm for the trip home.

Once back at the greenhouse I had to move all of my gold fish out of three of the tanks and into a single tank, which took me a couple of hours..it's hard catching 75 gold fish...I now have about 100 in one tank.

Before doing this I opened the box to check on the fish and placed an air stone in the box to aerate the water. I also, checked the PH and Ammonia of the fish box water, the PH was 7.2 and the Ammonia was a whopping 8.8ppm, versus my own tanks levels. I thought the fish were going to be goners...but they are tuff. I started adding water from my fish tanks over the next three hours to help equalize the PH and cut the Ammonia down, after which I introduced the new fish to their tanks. I graded these into three sizes, small, medium and large and placed each size in their own tanks.


Here is a video overview of the Tilapia in their new homes.


I also picked up a 50# bag of Cargill Aquafeed for the little beasties, that should last me several months. I plan on going back in June for more fish and will pick up another bag of feed if the fish do well on it.


 Until next time....keep on farming those fish and veggies.

Thursday, March 1, 2012

Insulation for the Fish Tanks

Sorry everyone for not posting lately, too many projects going on and with the daily grind of  "normal life" I haven't had much time to pursue my Aquaponics dream. Anyway, I decided to insulate the tops and bottoms of the fish tanks with 1" extruded polystyrene foam board that I picked up from Home Depot. I purchased four 4' x 8' sheets along with a couple of cans of 3M Super 77 spray adhesive to glue all the foam board up with. It was a challenge since I had to piece everything together on the top of the tanks due to the fact that I couldn't move the grow beds. Each individual piece had to be measured and cut to fit as no two pieces were the same. Time to complete 2-1/2 days. It was worth it and has cut down on the evaporative water loss from the fish tanks, which in turn has cut down on the humidity in the greenhouse. Oh..and did I mention the cost saving on electric to heat the water.  It dropped my bill by about 30%, almost to it's typical winter norm. And the cost for all of this was about $60 dollars. This is one of those " I wish I had done this sooner or first" situations. Hey, it's a learning experience...right? Oh well, I will know better in the future.  Of course, I am a little late on planting for seedlings, but that's for the next post. Until next time....


Tuesday, January 10, 2012

Solar Hot Water Heater for Fish Tanks

OK...so I got the great idea of building a solar hot water heater out of black poly tubing and having that connected to one of my fish tanks in order to cut the electric bill down on the aquarium heaters I run. I am having mixed results, with a net gain of 4-5 degrees over the ambient temperature of the fish tank water. I was expecting much more.


Initially, I placed 75ft of poly tubing into a 4'x4' box (2x4's) made out of Dow blue board and clear / white poly carbonate panels with the inside painted black as shown in the video.  This is all connected to an Aquatop 496 GPH submersible pump which has been choked down to about 250 GPH to give the water enough transit time through the pipe to heat up. I found that I did not have enough pipe so I added another 100' to the existing pipe, I am in the process of sealing the box, and I will need to use glass on the front to better trap the heat as the poly panels don't do a good job. I have a resource to buy cheap used windows and will be heading down to look for one soon.  I have posted some pics of the unit as well.


 Until next time....

Thursday, December 15, 2011

The Aquaponics Gardener Greenhouse update for December

Just thought I would throw together a quick update on the progress of the greenhouse. It's been a month since the last video showing how all of the plants and fish are growing....I'm very excited to see that the system is really starting to crank out the produce, and in the middle of winter...just mind numbing. Anyway, here's a quick look.

 And as stated in the video we had our first harvest of produce, I picked and prepared Swiss Chard, all types of Kale, Basil, Arugula Chocolate mint,  and spearmint which was mixed up in a nice salad.  It was really good, and there is plenty left over for a few days. I still have quiet a bit more growing in the greenhouse.

Tuesday, September 27, 2011

IBC Tote tanks... continued

Alright, I have placed the last two tote tanks and configured them like the ones in the previous post without any issues. After measuring the standpipes  and bell housing, I had to cut them down by 1-1/2" to get the water level down to 10" in the growbeds which would allow for 12" deep grow media. I also added some drain holes to the outside perf pipe and covered them with fiberglass screening to allow for better water penetration into the siphon, without this I would get a premature siphon break half way through the cycle with substrate in place. Next, I ordered two 950 GPH magnetic drive pumps from a seller on eBay at a huge discount. I basically picked both units up for the price of one. These have been installed and a working as planned.


I also ordered a commercial air pump for use in the tanks with a 6 way control valve assembly and four 18" air stones. This unit puts out 45Liters per Hour which is more than enough for the 1100 Gallons of water I have in the fish tanks. It took about 30ft of 1/8" tubing extended to all tanks to get this in place.

 I also built a small shelf to house the unit and valve assembly. I had to bolt the air pump down to the shelf so it didn't vibrate around and fall off.

I have added 20 feeder gold fish to the tanks (5 for each tank) to start the nitrogen cycle process. I have had a few die off due to stress so I will be adding more as time permits.


Next it's on to the growbed media.....

Wednesday, September 7, 2011

IBC Tote Tank Aquaponics

I know it's been awhile since I last posted to the blog, but I have been very busy planning the inside of the greenhouse. I know the blog is about Aeroponics, but I just had to start out with some Aquaponics adventures to set the stage for future Aeroponics endevours. So, without further ramblings, let's dive in. I searched our local Craigslist coverage area and found an inexpensive source for 275 Gallon IBC ( International Bulk Container) tote tanks ($50 ea.) which were single use food grade totes that contained liquified corn sugar (not corn syrup). This stuff was really sticky and messy, having the consistency of molasses, but without the sugary smell or taste When looking for these types of containers, always look for food grade, or ask the seller what the previous contents were before committing to a purchase, some IBC's are used to transport hazardous chemicals or petroleum products, not good for the fish, plants or you. So I purchased two of these bad boys, and loaded them up in the truck for the eighty mile trip back home. Once I got back, I unloaded these with the help of my son, as they are approx. 75lbs empty, it's can be tricky moving them off the back of the truck.

First step in prepping these totes for use in an Aquaponics system is to remove the top retaining brackets as shown in the photo below. The screws take a large Torqs Bit, which I did not have, but an alternate was to use a Hex bit which fit nicely in the head of each retaining screw.

Moving on, the next item on the list is to remove the plastic tank from the cage, which can be accomplished by laying the whole unit on it's side and sliding the tank out of the cage.

Before cutting up the frame for the various pieces needed in the Aquaponics system. I took a pressure washer and sprayed out the inside of the plastic tanks as a precursor to cleaning them after prepping the cage.

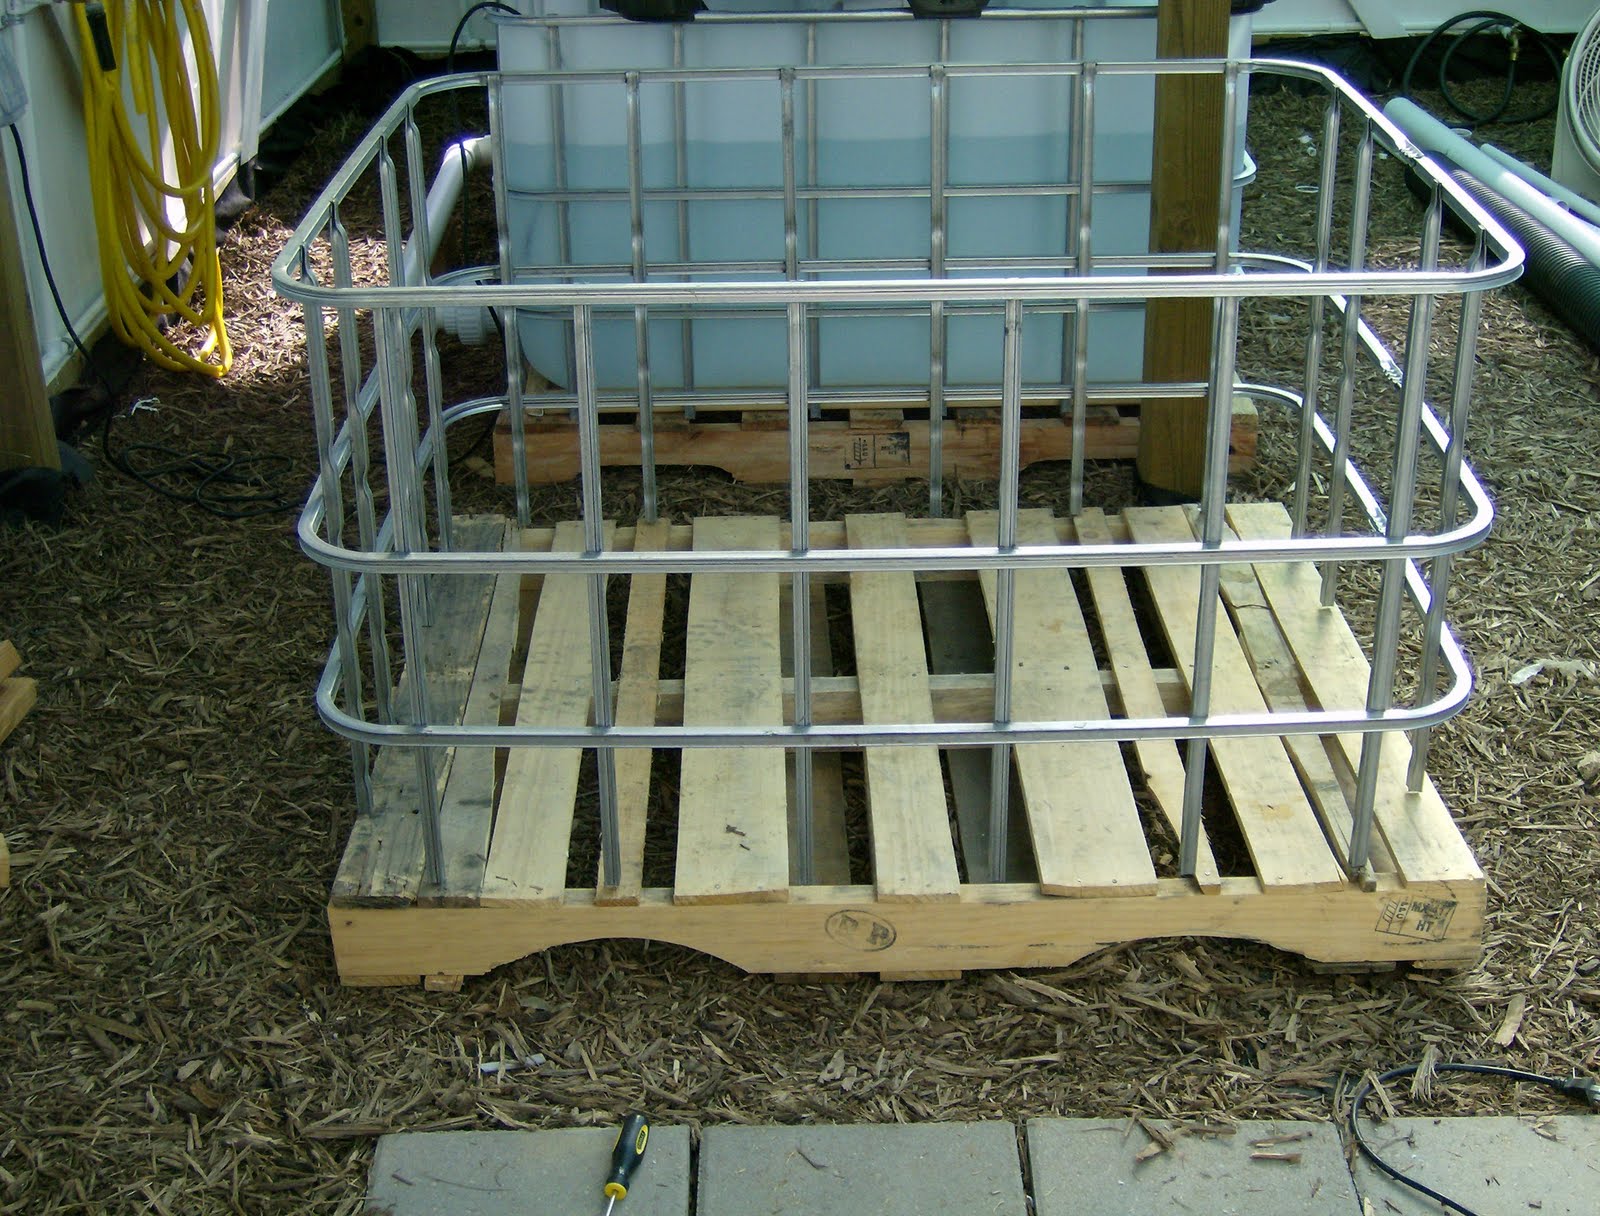
On to the cage/frame prep. I used a metal cutoff blade in my old trusty B&D 7-1/4" circular saw to cut the metal tubing on the cage. Cuts were made all the way around the cage at the second horizontal cross member as shown below.


At this point prior to cutting, I removed the black corner braces and tossed them aside as they will not be needed for the project.


After cutting is complete on the cage, I had to cut a whole in the center of the base for the PVC piping that would have to protrude through to the fish tank as the bottom of the cage would now be the base for my grow bed. Using the circular saw I cut out an approximate 4" x 6" opening in the base.

After this, I took a 4-1/2" angle grinder and took off any visible burrs around the opening and also on each vertical brace of the cage where I cut the cage into two pieces.
After this, it was on to cutting the plastic tote into two pieces. In order to do this the tote would have to be turned upside down and placed back in the base without the scew-on 6" lid in place. Once in place, I took a felt tipped marker and drew a line around the plastic tote at the top of horizontal cross member.


After marking the line around the tote, I removed it from the base and laid it on it's side. In order to cut the tote, I purchased a 120 Tooth plastic/vinyl blade for $10 from my local Lowe's Home Improvement store.

Here is the finished product.
At this point I spent the next two hours cleaning the inside and outside of the tanks. Removing any residue left by the pre-wash by using a combination of Crude Cutter Cleaner, TSP, the pressure washer and good old hand scrubbing.  Once this was done I moved on to prepping the wooden pallets as a base to accept the larger cage for the Fish Tank  I simply placed the pallet where I wanted it to go, and then attached 2"x2' furring strips to the pallet inside the cage perimeter as shown, which hold the cage in place while providing an easy breakdown if it needs to be moved.

All that was left for the major assembly was to place the large half of the Tote Tank into the pallet base which would serve as the Fish Tank, while placing the Metal Base on top of the palletized tote for use as the grow bed.


The top tanks are approximately 15" deep which is perfect for a 12" grow bed. I intend to use Growers Stone which is an inert lightweight material which looks similar to lava rock as a growing medium. Next it's on to the Affnan Bell Siphon, which is made out of 1" PVC pipe and along with a 1-1/4" reducer coupling SxT, 1" female adapter, 2" Male Adapter, and two reducer bushings, one is a 2x1", and the other is a 1-1/2x1" reducer.The last three items are actually glued together and screwed into the 6" screw on cap which the 1" standpipe/bell siphon attaches to. I also used 3" PVC for the bell portion of the siphon with a 3" plastic test cap glued in place with corresponding diagonal cuts on the bottom to break the siphon once the water reaches the bottom of the grow bed. Lastly, I used 4" perforated corrugated drain pipe over the whole siphon to protect it from the gravel in the beds, and to provide better water circulation.


Here is what the whole set-up looks like when put together.

The above picture also shows the ebb & flo growbed in action. I timed the fill at approx. 25 minutes per 200 gallons of water, so for two grow beds in each system with a full compliment of grower stones which will displace approximately 50% of the water in each bed, that cuts the time down to less than 15 minutes, with a drain lasting approximately 5 minutes I should be able to get 3 cycles per hour, not optimum, should be 4, but three will do.

With the 1-1/4 reducer, it takes approx. 25 seconds for a full force siphon to start. I may try to order the 1-1/2 reducers as my local home improvement & hardware stores don't carry them. This would reduce the siphon start time to approx. 5-7 seconds. I used a 600 GPH magnetic drive submersible utility pump with an attached pre-filter to supply water to two tanks at a time.


In order to do this I had to connect the two tanks together. I decided to use the existing 2" ball valves that were attached to the totes from the factory as each one has 2" IPS threads which will accept a 2" female PVC adapter. To this I attached a 2" PVC Union and 2" 90 degree DWV elbows and 2" PVC pipe between each tank for the connection as shown in the next photo. This gives me the added ability to remove the connection and drain/clean or work on individual tanks when needed.


In order to feed water to each grow bed I came up with a PVC manifold using 1/2" PVC pipe and fitting.
This was attached to the pump with a section of black UV resistant 5/8" card hose.

and here is the system at it's present stage of completion. I am in the process of adding two more Fish Tanks/Grow beds for a total of four in the greenhouse.


I still have to add an air system to the tank for Dissolved Oxygen (DO) in the tanks, along with a way to heat the water in the winter and cool it in the summer, perhaps a pond heater and a Chiller are in my future. I will save that for upcoming post....hope you have enjoyed the journey so far. Until next time...